
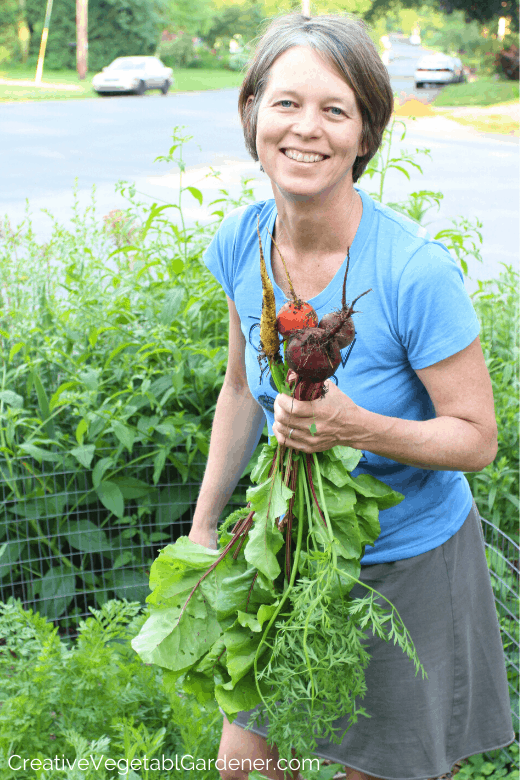
If I asked you for a list of your favorite vegetables to eat, beets probably wouldn’t make an appearance in the top five.
It’s not the most popular vegetable in the garden patch.
And with good reason – most people grew up eating slimy and bitter grocery store canned beets. Blech!
(If you were one of the lucky ones, like many of my neighbors in Wisconsin, maybe you were treated to your grandma’s canned pickled beets instead. Those were probably a little more tasty.)
I have to admit, a beet never graced my lips until I became a gardener 20 years ago. I probably didn’t even know what a beet was until I was in my 20’s.
I think my mom was scarred by the aforementioned canned beets growing up, so we never saw one on our dinner table.
But, we gardeners know a secret that many other people don’t – every vegetable that comes out of our gardens is more delicious than what we can buy at the grocery store.
Growing and eating your own beets is just like growing and eating your own tomatoes, they’re a completely different vegetable when they come out of your own backyard.
When you think of eating beets, what do you imagine? If you thought of dark nights, warm ovens, and cozy winter dishes you’re not alone! Fall and winter are favorite seasons for eating beets.
That’s why they’re the perfect vegetable to grow in your fall garden. If you take the time to plant a few rows of fall beets this summer, you’ll be rewarded with the harvest through late fall and into early winter.
And if you store them right, you can eat them all winter long. Last year I was still eating my summer planted beets the following May.
That’s a pretty good bang for your buck, I’d say! Here’s how to plant and grow fall beets.
How to Grow Fall Beets in Your Garden
It’s so easy. If you even remotely like to cook with and eat beets in the winter you have to try it! Let’s break it down a little bit further so I can show you just how easy it really is…
Step 1: When is your first frost?
Figure out your average first frost date. If you’re not sure when it is, you can go to this website and type in your zip code. It will give you a range for your average first frost. You can pick a date somewhere in the middle of that range.
Step 2: Plan your planting schedule.
Beets can be planted up until about six weeks before your first frost. Count back from your average first frost date to six weeks before.
This is the last time you’ll be able to plant beets in your garden so they have time to grow to a harvestable size. You can plant beets whenever you want up until then.
Beets are great for succession planting, planting the same vegetable several times throughout the season for a continued harvest. In my zone 5 garden I starting planting beets about four weeks before my average last frost in May, and then continue planting every three weeks (or whenever I have space) through to about mid-August.
A note from my garden: I’ve found that the earlier I plant them for fall the bigger they get. I shoot for my last planting about 8-10 weeks before my last frost. Make sure you’re keeping track of planting dates somewhere so you can see what works for your garden.

Step 3: Plant
Beets are a multi-germ, which means although it looks like you’re planting one seed, there could actually be up to 5 seeds within the seed ball. That means a bunch of seedlings may come up right at the same spot. I’ll explain what to do about that in the next step.
My biggest tip for planting beets is to slightly over-seed! I find that the red beet varieties germinate best, and the yellow and Chioggia are more spotty.
Planting thickly and then going back to thin is the method I recommend for the most even planting.
Step 5: Water!
Keep them watered! In many gardens it’s very dry during summer when you’re planting fall beets. Make sure you’re watering your newly seeded garden bed 1-2 times a day (morning and evening) until germination.
Luckily, beets are quick to germinate in warm soil and should be poking through within a week.

Step 6: Beet care after germination
Water: Once they germinate put them on a 1 inch per week watering schedule (more if you live in a very hot area or have sandy soil). Most vegetables like this amount of water per week. If it rains an inch you don’t have to water. If it’s dry you should take your hose out and soak the bed.
Get my best tips for watering your vegetable garden.
Thin: We learned above that a you may have multiple beet seedlings germinate in the same spot. If you leave them with that spacing your beets won’t grow very big because they’ll be overcrowded.
When the plants are a couple of inches tall you can go back and thin the rows. The recommended spacing for beets is 2-3 inches between plants. To achieve this you’ll need to pluck out or cut off at the soil level every beet that isn’t 2-3 inches from the one next to it.
I know thinning can be painful for many gardeners! But, you’re going to get a much better beet harvest if you do it. I save all of my beet thinnings in a jar in the fridge and we use them in our lunch wraps and sandwiches. Yum!
Thinning is especially critical in the fall when plant growth is slowing down. You want the beets to have plenty of space so they grow as quickly as possible.
Mulch: After thinning your beets you should then put a layer of mulch between each row to keep the garden bed weed-free and trap in soil moisture. I highly recommend keeping your entire garden mulched at all times, unless you’re waiting for seeds to germinate.
Read more about vegetable garden mulch and why mulch is the ultimate garden tool.
Step 7: Harvest
Beets are usually at harvest size about 55 days after planting, depending on what variety you plant and the conditions in your garden.
But, plant growth slows down in the fall as the days get shorter, so conventional wisdom says add about a week to this number.
I’ve found that individual beets tend to grow at different speeds so I like to go through the bed and harvest the biggest ones first and let the others continue to grow. This will also help you avoid having so many beets you don’t know what to do with them!

Step 8: Let them hang out in the garden
The great thing about fall growing is that the cooler weather is like natural refrigeration. You can keep your beets in the garden for a long time! They’re frost hardy, so they don’t mind the colder nights of fall and early winter.
If you live in a very cold area like I do in Wisconsin, you should keep your eye on the nighttime temperatures and harvest the bed of beets once it’s starting to get down into the mid- to low 20’s F. At these temperatures they tend to get frost damage.
Step 9: Store fall beets for winter
If you end up with a big harvest in early winter, don’t worry. Beets are incredibly easy to store fresh for long periods of time. You don’t have to can, freeze or otherwise process them if you don’t want.
You can store your fall beets in your fridge for use in savory recipes all winter long with a few easy steps. Using this method I’ve successfully stored fresh beets in my fridge until the following spring.
Read exactly how to store beets for many months of winter.

What Varieties of Fall Beets to Grow
One of the benefits of growing your own food is the opportunity to plant things you can’t get (or are really expensive) at the grocery store.
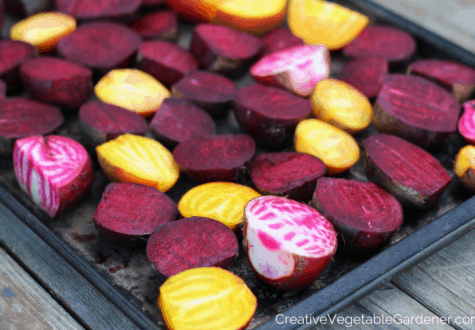
Mix in some other beet varieties besides red in your plantings throughout the season. I usually plant about 2/3 of my garden bed in red beets and then add a row of yellow and candy cane beets to spice things up a bit!
I purchase the majority of my seeds from Johnny’s Selected Seeds and High Mowing Seeds. All of the below varieties can be found there.
Red Beet Varieties
Detroit Dark Red – this is the variety I commonly grow in my garden
Bull’s Blood – has great dark leaves
Cylindra and Formanova – instead of a round shape you’ll get a more cylinder-like beet
Yellow Beet Varieties – I like the greens of yellow beets the best. They’re more mild and I throw them in my morning smoothies.
Touchstone Gold
Boldor
Badger Flame
Candy Cane Striped Variety
Chioggia
White Variety
Avalanche – I grew this one year as a fun experiment. It tasted a bit more earthy than the other beet varieties, but I still enjoyed the taste.
Did you know that beets are one of 30 different vegetables you can plant in your fall garden to extend the season? Every year I harvest a huge cooler full of vegetables to cook up for Thanksgiving dinner, even though I live in Wisconsin.
Learn how you can grow a cold weather garden, too, by checking out my Masterclass below.

Additional Resources for Fall Gardening
MASTERCLASS: Harvesting Fresh Veggies in the Snow. The key to having more fresh food right outside your door for more months of the year is to extend your garden season. And if you do it right, you can be harvesting delicious veggies for up to 10 months of the year, even if you live in a northern climate!
I live in Wisconsin, zone 5, and every year I harvest food from my garden during most months of the year -without a heated greenhouse or any other expensive additions to my garden. In 25 different videos and accompanying worksheets, checklists, and calendars, I distill my years of trial and error down to just the essentials you need to know to help you plant and harvest from a robust cold weather garden.
BLOG ARTICLES: Read more about how to have an awesome fall garden in these posts.
- 8 Easy Vegetables to Grow in Your Fall Garden
- Plant Now for Spinach Next Spring
- Why Growing a Fall Garden Is So Easy
SHARE IT ON PINTEREST


Comments
[…] Beets Unlike a lot of other fall vegetables, beets have no trouble germinating in the heat of summer. And they’ll be ready for harvest as the weather cools down and you’re in the mood for roasted root vegetables. I like to mix yellow, red and Chioggia varieties together in one garden bed. (You can read more about how to have eat beets from your garden all winter long here.) […]
[…] How to Eat Beets From Your Garden All Year Round […]
I keep trying beets but they just don’t seem to germinate for me. Neither in the spring nor the fall…I plant a whole packet and get maybe 2-3 beets…Live in New England.
What varieties do you grow and where do you get your seeds? I water newly planted seeds twice a day, unless it rains, until they germinate.
I have tried planting beets so many times, but just harvested my first one this summer. I added some extra fertilizer to the raised bed before planting, so maybe that made the difference. I will try again one more time before it gets too cold. I’d love to have beets this fall!