I used to skip growing winter squash myself. It’s a sprawling plant, and I just didn’t have the room for it most years. Instead, I would take a trip to my local farmers market in the fall and load up a few boxes with the amount of squash I needed for the winter.
It’s much less expensive to buy organic winter squash at the height of the season than in the middle of winter, when it’s shipped in from far away. And you can find some fun, interesting specialty varieties that never make an appearance at the grocery store.
Nowadays, I have several cattle panel trellises in my garden which have increased my vertical growing space, so I’ve been experimenting with growing my own storage varieties.
Whether you’re growing your own or buying at the market, knowing how to properly store winter squash is what makes the difference between a squash that lasts through spring and one that goes soft and disappointing within a month.

Which Varieties Store Best?
I recently came across an article on Johnny’s Selected Seeds’ website called Understanding Flavor & Yield in Winter Squash: Why Some Taste Better Than Others, and it explained a lot I’d never understood about why some of my butternuts taste amazing one year and bland the next, or why they sometimes turn spongy in storage.
Here’s what I learned, though if you’re a real squash lover, I’d recommend reading the full article yourself.
A good eating-quality squash comes down to sugar and starch content. More sugar means a sweeter taste (and it helps mask less desirable flavors). Less water content at harvest means more starch, which means a smoother texture.
Harvest timing affects flavor. As the article puts it, “fruit that looks good doesn’t always taste good.” Rather than judging by sight, the best approach is to harvest about 50–55 days after pollination, which is when the plants begin to set fruit. That’s tricky to control if you’re buying rather than growing.
Different squash types need different curing times before they taste their best. Some varieties are ready to eat right after harvest; others actually need weeks or months in storage first to develop good flavor.
There are three types of winter squash:
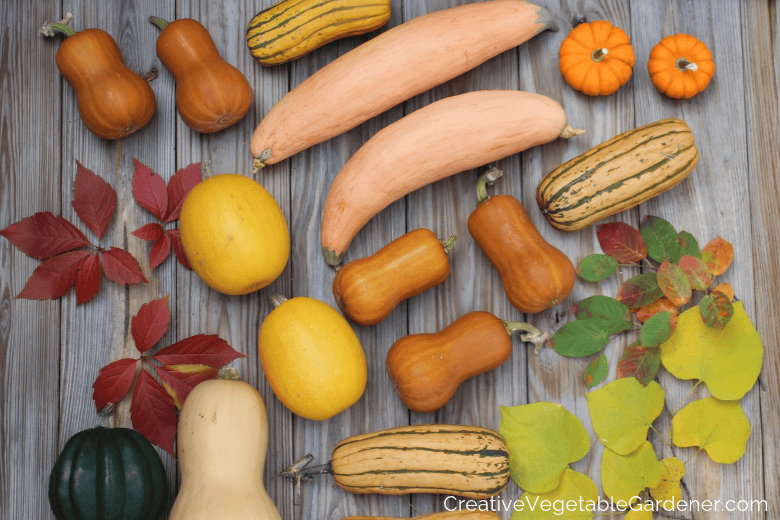
Cucurbita pepo — Delicata, Sweet Dumpling, Acorn & Most Pie Pumpkins
These can be eaten immediately after harvest or purchase, no curing needed. I always eat my Delicata first and don’t bother storing them; I treat them as a special early fall treat while I wait on everything else. Acorn squash, on the other hand, stores well for 2–3 months. I generally aim to eat mine by the end of the year. A few make it into holiday dishes.
Cucurbita maxima — Kabocha, Hubbard & Buttercup
These types are often too dry to eat right at harvest. They need time in storage for the starch to convert to sugar. Mini kabocha (any color) and red-skinned varieties like Sunshine and Red Kuri are the exception — they’re good at harvest and keep for 2–3 months. Full-size buttercups, green/gray kabocha, and hubbards need 1–2 months of storage before they’re at their best, and will keep for 4–6 months total.
Cucurbita moschata — Butternuts & Some Edible Pumpkins
Mini butternuts (like Honey Nut) can be eaten right at harvest and store about 3 months. Full-size butternuts and similar varieties like Long Island Cheese need 1–2 months of storage before eating, and will keep for 4–8 months depending on the variety and your storage conditions. Storage actually increases their carotenoid content too, making them more nutritious over time. In my house, we save the longer-storing butternuts for last and often eat them well into April.
Johnny’s Selected Seeds also has a helpful curing and storage chart on their site if you want variety-by-variety specifics.

Choosing Squash for Storage
You don’t need a root cellar to store winter squash successfully – a basement, cool closet, or even an unheated mudroom works just fine, as long as it’s not damp. I store mine in the cold room in my basement, but plenty of people have great luck with much simpler setups.
When you’re browsing the farmers market (or your own garden) for winter squash to store, inspect each one carefully and pick fruits without big nicks, dents, or scratches. These are the spots where rot sets in and ruins the whole squash.
If you’re harvesting your own, leave a 1–2 inch stem attached to each squash, and never use the stem as a handle for carrying it. A broken or knocked-off stem creates an opening for rot to get started, which can spoil the squash well before its time.

When to Harvest Winter Squash
If you’re growing your own, a few visual cues help you know when it’s time to pick:
- Acorn squash is ready when the spot where it touches the ground turns a bright, vivid orange.
- Butternut squash shifts from a pale greenish tint to a more brown or tan color.
- Across all varieties, ripe squash should resist a light press of your fingernail. If your nail sinks in easily, it needs more time.
In general, 50-60 days from pollination is a good time to harvest. Whatever you’re growing, make sure to get everything out of the garden before the first frost. Winter squash is not frost hardy.
A Note on Growing Squash: Watch for Squash Vine Borer
If you’re growing your own, one of the biggest challenges is squash vine borer. This pest killed all of my winter squash plants in one season. It generally goes after the more common squash varieties like Delicata and Acorn.
After doing some research, I discovered that winter squash in the Curcurbita moschata [C. moschata for short] species have more dense, fibrous stems that provide strong resistance against the squash vine borer.
The next year when I was shopping for seeds in the Johnny’s Selected Seeds catalog, I only ordered squash that were listed as C. moschata. Johnny’s website listing for each seed will tell you its Latin name. That year I planted Honey Nut, Black Futsu, and Long Island Cheese.
Low and behold! All of my plants survived the squash vine borer and I had an amazing winter squash harvest.
Now, I won’t grow any winter squash that’s not in C. moschata. I supplement my squash storage with other kinds of squash, like Acorn, from my local farmers market.

How to Store Winter Squash: Step by Step
You don’t need special equipment for this — just garden clippers (if you’re harvesting your own) and a warm, dark spot to cure your squash.
- Cure it first. Set your squash in a warm, dark place for about a week after harvest. If you bought it at the farmers market, curing is still worth doing, since it’s possible the vendor harvested it just before market day.
- Inspect for damage. Set aside any squash with bruises or nicks to use first, they won’t store as long.
- Store in a single layer. Place squash in crates or boxes, in a single layer, in a cool, dry space. I use the cold room in my basement.
- Get the conditions right. Winter squash stores best at 50–60°F (10–15°C), with 50–70% relative humidity and good ventilation. Repeated exposure to temperatures below 50°F can cause chilling damage, so avoid anywhere too cold.
- Eat in the right order. Use up your shorter-storing varieties first, and save the longer-storing types (like full-size butternuts) for later in the winter.
- Check periodically. Look your squash over every so often for soft spots or spoilage, and use or toss any that are starting to go.
Another Option: Roast and Freeze It
If you’d rather skip whole-squash storage altogether, or you want to use up squash that’s starting to turn, you can roast it and freeze the flesh instead. Roast the squash until tender, scrape out the flesh, and pack it into containers or freezer bags. This is a great way to have squash ready to go for soups and purees all winter without needing the cool storage space that whole squash requires.
How Many Should You Store?
That depends entirely on how much you love squash! In our house of two, it’s a weekly staple through the winter. Looking back at my own records from the past few years, I typically store 9–12 butternuts and about 5 acorn squash for the season.

Favorite Recipes
The most common way we eat our winter squash is roasted in the oven. We cut slices of acorn and delicata or use halves, and cube the butternut. From there, they find their way into all kinds of dishes. Here are a few of my favorite squash-specific recipes I’ve found over the years:
- Roasted Corn Pudding in Acorn Squash from 101 Cookbooks
- Easy Coconut Curry from Love and Lemons
- Roasted Butternut Squash Risotto from Cookie and Kate
- Thai Curried Butternut Squash Soup from Cookie and Kate
Frequently Asked Questions About Storing Winter Squash
How long does winter squash last in storage?
It depends on the variety. Delicata doesn’t store well, so eat it soon after harvest. Acorn squash keeps for 2–3 months. Buttercup, kabocha, and hubbard squash keep for 4–6 months once properly cured. Full-size butternuts are the longest keepers, lasting 4–8 months depending on the variety and your storage conditions, sometimes well into spring. I’ve eaten mine as late as April.
How do you know when winter squash is ripe and ready to store?
The most reliable method isn’t looks — it’s timing. Squash is ready roughly 50–55 days after pollination, which is when the plant begins to set fruit. A hard rind that resists being pierced with a fingernail is also a good sign it’s mature enough to cure and store.
Do you need to cure winter squash before storing it?
Yes, for best results. Setting the squash in a warm, dark spot for about a week after harvest toughens the skin and helps heal over any small cuts or nicks, which significantly extends how long it will keep. This applies whether you grew it yourself or bought it at the farmers market, since you can’t always be sure how recently it was harvested.
Can you store winter squash in the fridge?
You can, but you don’t need to, and it’s not the best option for whole, uncut squash. Winter squash keeps best at 50–60°F with good ventilation. A typical fridge is colder and more humid than that, which can actually shorten its storage life. Save the fridge for once you’ve cut into it (see below).
How do you store squash after cutting it?
Once you cut into a winter squash, the clock starts ticking. The hard rind is what protects it in long-term storage, and once it’s broken, the squash needs to move to the fridge. Wrap the cut portion tightly in plastic wrap or place it in an airtight container, and use it within about a week. If you know you won’t use the rest that quickly, cube or slice it, roast it, and freeze it instead. Cooked squash freezes well and can be pulled straight from the freezer for soups, purees, or roasting.
Why does my stored squash sometimes taste bland or watery?
This usually comes down to timing and variety rather than something going wrong. Varieties like kabocha, hubbard, buttercup, and butternut are often bland or watery right at harvest — they need time in storage (1–2 months, depending on the type) for their starch to convert to sugar. If you’re eating them too soon after harvest, give them more time before writing off the flavor.
Whether you’re hauling home a few boxes from the farmers market or pulling your own harvest off a trellis, a little care at storage time is what turns a one-time squash haul into months of good meals. There’s nothing quite like reaching into a cool, dark corner of the basement in February and pulling out a squash that’s every bit as good as the day you harvested it.